Scheduler Applications
Apr 01, 2021
Introduction
Already use a scheduler?
Well, we have templates for Initial Calls, Onboarding Meetings, Data Gathering Meetings and more!
Our most popular form, the Document Needs List Generator (with responsive upload fields) is usually linked within meeting confirmation emails to ensure clients send the necessary documents ahead of a “Get Organized Meeting”.
Click here to see our other automation-ready JotForm templates. We will cover JotForm later in this series, but our forms all include step-by-step use and customization guides. JotForm’s easy integration setup makes connecting a form to your document storage application (Google Drive, Box, Dropbox, Egnyte, etc.) extremely simple.
Each of our forms includes a comprehensive video series on how to edit and use the form. While most of our forms are primarily used by Financial Advisors / Planners, Consultants and Attorneys there are some that are non-industry specific and the others can be customized further using our JotForm training courses. Purchasing the form will enable you to book a discounted Coaching Session with us to help you edit/modify the form for your specific needs if you need additional assistance.
What are Scheduling Applications?
A scheduling application is a digital assistant that serves one purpose: clients, vendors and partners can book meetings without you (or your real life assistant) playing the email exchange game. Aside from removing the back and forth normally required to schedule a meeting, schedulers also allow you to customize confirmation emails and meeting reminders, as well as generic meeting follow up emails.
The best feature schedulers have is booking forms. Depending on the meeting time, you can customize booking forms (albeit it is fairly limited) to get relevant information. While this feature is amazing all it’s own and great for firms just starting out, if you’ve been in business for a while and get bookings from people who don’t fit your niche, then we have a solution for that.
Click here to see our Pre-Screening Questionnaire. It’s often used to obtain a plethora of data so you can qualify, disqualify and make the most out of your first meeting with a prospect. The best part is, with an automation tool like Zapier (we’ll get into that later in the series) you can have the submission of this form create contacts for you in your CRM, but I’m getting ahead of myself.
Our preferred scheduling applications
-
Calendly - It’s simple and easy to use. Perfect for any sized firm.
-
Acuity - This is Calendly’s smart cousin. It does everything Calendly does and more. In terms of use, most firms can get by with Calendly, but if you have more nuanced needs, you should explore this application.
-
MeetingBird - It’s similar to Calendly and has fairly robust features.
-
Google Calendar - It’s free. You can add an extension to your browser and use it as you would another scheduler (for the most part).
Out of the above list, Calendly is our absolute favorite. We’ve used several other tools in our quest to find what best fits our needs in terms of integration, reliability, cost and team calendars. Calendly is a gem of a tool and it has made our business meetings very manageable. Our Calendly accounts are integrated with Zoom and our Google Calendars.
Getting Started with Calendly
In this blog series there are a lot of tools and resources we will cover. I am confident that Calendly is something so simple to start with that going into depth with getting started will be an insult to your intelligence. Their getting started guide is more than enough.
If you’d still like a break down, here’s how you can get started:
-
Create an account (preferably with your Gmail account for convenience)
-
What Event Type is This? - This is where you give it a name, add a description and define the event type.
-
When Can People Book the Event? - This is where you configure the event’s availability in terms of days and times. You can set advanced notice options under the “Advanced” tab.
-
Invitee Questions - This is where you customize the booking form (as a best practice, we recommend the split name field with individual blocks for first and last name).
-
Notifications and Cancellation Policy - This is where you set your confirmation notification as either a Calendar Invite or Confirmation Email (recommended). You can also configure your meeting reminders. If you use our templates, you’d normally link them in the confirmation and reminder emails with a sentence that says, “Please click here to complete our awesome questionnaire. Filling this out ahead of our meeting allows us to make the most of our time together by enabling us to have a productive meeting.”
-
Confirmation Page - This is where you configure if a meeting booking either takes the invitee to a Thank you page or redirects them to another website. A best practice for an initial meeting is to redirect a person to your FAQ page or a hidden “Thanks for booking” page on your website with additional information relevant to that meeting. While you can enter some of this information in the notification emails. (Though our templates wouldn’t admit it, they’d be absolutely crestfallen if their bright shiny links had to compete with walls of text. We generally don’t recommend that from a client experience standpoint either.)
This day and age, there’s very little reason to work harder, except to produce bragging rights. If you’ve found a way to factor bragging and boasting into meaningful productivity and efficiency, please let us know. We’d love the chance to proclaim our greatness if it translated it into actual work getting done and emails getting responded to.
Optimal Calendly Setup
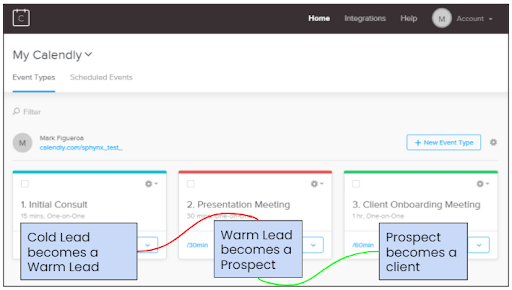
Calendly appointments should be clearly defined and should sequentially represent specific phases of your client life cycle. Think of your client life cycle as highway and your meetings are major exits. This approach will enable you to set up a simple and efficient automation sequence.
Ex: Imagine each meeting can create contact records or attach workflows for you. Here’s what that might look like:
- Sphynx books an initial consult.
- Zapier creates “Sphynx Household” in Wealthbox.
- Sphynx books a client/onboarding meeting.
- Zapier creates the “Sphynx” client record under the “Sphynx Household.”
We will get into this later in the series, and clearly walk through setting up a piece of the sequence described above. For now, refer to the image below for ideas on structuring your Calendly events.
Up Next
As always, thanks for following the series. This post covered Schedulers and Scheduling Applications with a focus on Calendly. While we are Calendly connoisseurs, we aren’t scheduler snobs and strongly recommend evaluating your firm’s needs and how much you’re willing to invest (be it time or money) to streamline your booking process.
These posts are created with the intent that you will do some exploration, so we publish them every two weeks to ensure that you don’t have to spend 3 hours on a weekend following along; instead, you can spend an hour a day for 3 days, following along, doing additional research and setting things up.
The next post will be another step away from the technical stuff. While I won’t go into details, it’s going to be something unique.
See you next time!
If you have any questions, feel free to ask. We’re here to help! Shoot an email to info@sphynxautomation.com or click here to see our form templates for sale.
Each of our forms includes a comprehensive video series on how to edit and use the form. For now, our forms are primarily used by Financial Advisors / Planners, Consultants and Attorneys. Purchasing the form will enable you to book a discounted Coaching Session with us to help you edit/modify the form for your specific needs if you need additional assistance.
This blog is written by the Sphynx Automation team to help DIYers use web-based apps.
Not a DIYer? Not a problem, click the button below to chat with us.
